CNC Bender Seam Detection
Contents |
This feature added in CNC Bender v11-20090609.
Seam Detect Mode in PreBend Dynamic Options
The seam detect logic was ported into the latest version of CNC Bender from the older LiteControl platform. It uses a secondary process list that runs in parallel to the main process list in order to detect a seam.
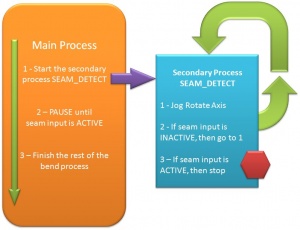
The diagram on the right shows the main process in the orange box on the left. This is the actual bend program process.
The box on the right is the secondary process called SEAM_DETECT_ROTATE_AXIS. It causes the rotate axes to spin until the seam is located and the seam detect input is ACTIVE. (This process can be modified for your application.)
When the seam is detected, then the SEAM_DETECT_ROTATE_AXIS process STOPS RUNNING, causing the ROTATION JOG to also STOP.
Then the main process detects that the seam detect input is ACTIVE and moves to the next step (See "3" in the orange box).
SEAM DETECT MODE DYNAMIC OPTION
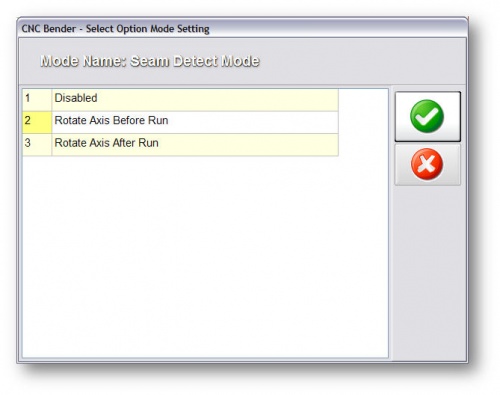
The new feature can be switched on with the Seam Detect option in the PreBend option:
Set the mode to Rotate Axis BEFORE or AFTER run buttons to include seam detection logic that will spin the rotate axis until a seam/scribe/etch is located.
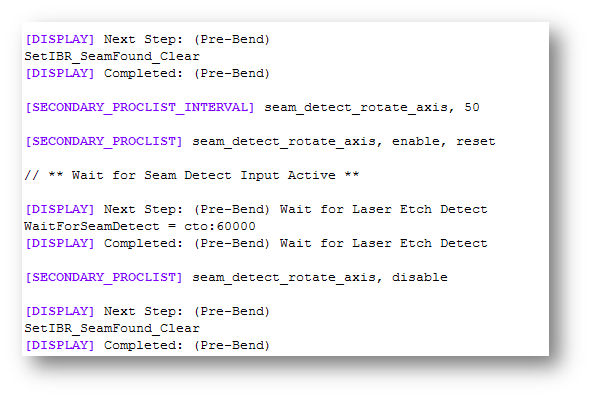
If enabled, the commands for seam detection are added to the process list between the chuck close and the run button logic. This is a sample of what is inserted. (What you see here represents the commands for STEPS 1 and 2 in the orange box in the image above.)

The new "seam_detect_rotate_axis.cncprocesslist" is a secondary multitasking processlist that is configurable to work with the application.
INTERNAL COMMANDS [direct_axis_jog] and [direct_axis_jog_halt]
[direct_axis_jog]
This processlist internal command will allow the process to direct-jog and axis as if a user had pressed a jog button. Configure the command by including parameters like this:
[direct_axis_jog] servo_controller_module_1, 2, 1
Each parameter is separated by commas and are defined as:
- PARAMETER 1: The first parameter is the name of the SERVO module
- PARAMETER 2: The second parameter is the axis of the SERVO module (1 or 2)
- PARAMETER 3: The third parameter indicates direction. "1" means positive jog. "-1" means negative jog.
[direct_axis_jog_halt]
This processlist command uses no parameters. It halts all jog motion.
Sample of How Used
These commands can be used to move, for example, the rotate axis until a seam is detected by a device which actives an input. Examine the "seam_detect" processlist to see how this works:
[direct_axis_jog] servo_233, 2, 1

[if] and, input=Input_SeamDetect_End
  // Seam detected - Disable the rotate jog now
  SetIBR_SeamFound_ON
  [direct_axis_jog_halt]
  [SECONDARY_PROCLIST] seam_detect_rotate_axis, disable
[end]
The jog command rotates the 2nd axis of the first servo module in the positive direction. This is the rotate axis. The motion continues until the seam detect input activates. At that point the jog is halted with the second command, and the secondary processlist disables itself.
Seam Detection CIOs and COMDEFs
CIO
- Input_SeamDetect_End - Is the input set by the seam detect's output when the seam is found
- Input_IBR_SeamFound_Activated - Is an internal input set when the Input_SeamDetect_End is true
- Output_IBR_SeamFound_Clear - Is the output that clears the above input point
- Output_IBR_SeamFound_ON - Is the output that sets the above input point
COMDEF
- WaitForSeamDetect is used in the main process to wait for the seam detect to go active.
Other Pages
- Back to CNC Bender
- Back to CNC Bender Software Updates
- Read about Push Bending
- Read about Push Bend Profile Tables


