Difference between revisions of "VTube-LASER v1.61"

From ATTWiki
Jump to: navigation, search
(25px NEW: Floating End Letters)
(25px ENHANCED: New Features and Interface in Measure Setup)
Line 32: Line 32:
 
<br><br>
 
<br><br>
  
===[[image:Check.jpg|25px]] ENHANCED: New Features and Interface in Measure Setup===
+
===[[image:Check.jpg|25px]] NEW: Automatically Set End A and End B Diameter===
  
 
<table cellpadding=10>
 
<table cellpadding=10>
 
<tr valign=top>
 
<tr valign=top>
 
<td width=300>
 
<td width=300>
The new grid interface in in Measure Setup has more options.<br><br>
+
If either End A or End B are set to a value of ZERO, then they will be automatically calculated based on the straight measurement adjacent to the end of the tube.<br><br>
 
+
New options include:<br>
+
*'''Continuous Scan on Tactile Cylinder-Scans''': Scan points repeatedly whenever you press the green button.<br><br>
+
*'''Continuous Scan on Tactile End-Scans''': Scan points repeatedly whenever you press the green button.<br><br>
+
*'''Automatic display of Master model''': Show the master model with the current straight highlighted orange during measure.<br><br>
+
[[image:vtube-laser_measuresetup_displayofmastermodel.jpg|300px]]<br>
+
 
</td>
 
</td>
 
<td width=400>
 
<td width=400>
[[image:vtube-laser_measuresetup_grid.jpg|400px]]<br>
+
[[image:vtube-laser_partsetup_grid_autoset_enddiameter.jpg|400px]]<br>
 
+
<br>
+
This is an image from continuous ball probe scanning:<br>
+
[[image:vtube-laser_continuous_tactile.jpg|400px]]<br>
+
 
+
 
</td>
 
</td>
 
</tr>
 
</tr>

Revision as of 21:35, 4 March 2011

Vtube-laser logo.jpg

Revision 1.61

Back to VTube-LASER

Vtube-laser 1 61.jpg


Check.jpg NEW: Floating End Letters

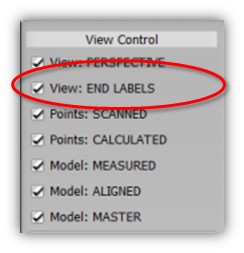
Floating end letters can be switched on to help identify the ends A and B of the tube.

Control the state of the labels in the View Control pane on the right side of the screen.

Vtube-laser floating end labels checkbox.jpg

Vtube-laser floating end labels.jpg


Check.jpg NEW: Automatically Set End A and End B Diameter

If either End A or End B are set to a value of ZERO, then they will be automatically calculated based on the straight measurement adjacent to the end of the tube.

Vtube-laser partsetup grid autoset enddiameter.jpg


Check.jpg ENHANCED: New Options in Part Setup

New A-End Diameter and B-End Diameter is added to the Part Setup menu.

The new diameters are used to qualify end-scans within the tolerance that is set in System Options (defaults to 1 mm).

Vtube-laser endscan diameter qualification tolerance.jpg

If either diameter is ZERO at measure time, then it will be reset to the current diameter value. This prevents a false rejection of good end-scan data.

Vtube-laser partsetup grid 1 6.jpg


Check.jpg Other Changes

  • Better math handling when the radius is set to zero.

  • Much more efficient redraws in the view port

  • Small user interface fixes and refinements

  • The maximum number of LLP strings per measure allowed is increased in the Measure 2 tab of the Systems Options menu.

  • The Measure a Tube control is changed to allow you to qualify the image on the screen before exiting the measure process. This adds a step to the measure process.

  • Include End A Diameter and End B Diameter variables in Supravision file import and export.

  • New help file and manual with updates and additional sections like "How to Scan a Straight."

Vtube-laser finish apply measure 1 6.jpg


Check.jpg Issues with this version fixed in next version

  • No known issues

Other Pages