Difference between revisions of "VTube-LASER ROMER RDS Performance Recommendations"
(→How to Enter the RDS VERSION 5 Control Panel) |
(→About HEXAGON RDS ("ROMER Data Service") Software) |
||
| (82 intermediate revisions by one user not shown) | |||
| Line 1: | Line 1: | ||
| − | <table width= | + | <table width= 1000> |
<tr cellpadding=10> | <tr cellpadding=10> | ||
| − | <td width= | + | <td width=400> |
| − | + | __TOC__ | |
| − | + | ||
| − | + | ||
| − | + | ||
</td> | </td> | ||
| − | <td width= | + | <td width=600> |
| − | [[image: | + | [[image:VTube-LASER_HEXAGONRDS_with_AS1_Scanner.png|500px]]<br><br> |
</td> | </td> | ||
</tr> | </tr> | ||
</table> | </table> | ||
| + | <br><br> | ||
| − | See also [[RDS Versions for ROMER Scanners]] | + | * Back to [[VTube-LASER]] |
| + | * See also [[RDS Versions for ROMER Scanners]] | ||
| + | * See [[HEXAGON Absolute Arm Feature Packs or Control Packs]] | ||
| − | |||
| − | ==About | + | ==About HEXAGON RDS ("ROMER Data Service") Software== |
<table width= 600> | <table width= 600> | ||
<tr cellpadding=10> | <tr cellpadding=10> | ||
<td width=200> | <td width=200> | ||
| − | + | HEXAGON RDS (from "ROMER Data Service") is a software system that connects software like VTube-LASER to any HEXAGON measuring device that uses the RDS.<br><br>See [[RDS Versions for ROMER Scanners]] for details of the different arms that RDS can connect VTube-LASER to. | |
<br><br><br> | <br><br><br> | ||
| Line 31: | Line 30: | ||
</table> | </table> | ||
| − | == | + | =HEXAGON RDS 6 Section= |
| − | + | ||
| + | ==How to Configure the RDS VERSION 6.2 Control Panel== | ||
| + | |||
| + | {| class="wikitable" style="width: 800px;" | ||
| + | !Comment !! Image | ||
| + | |- | ||
| + | | Left click on the up arrow in the system tool tray.<br><br>Left click on the blue R. || [[image:RDS6_systooltray.png|600px]] | ||
| + | |- | ||
| + | | Left click on the gear icon in the floating window. || [[image:RDS6_gear.png|600px]] | ||
| + | |- | ||
| + | | Click on Connection || [[image:RDS6_connection.png|600px]] | ||
| + | |- | ||
| + | | 1 - Check the instrument type.<br><br> 2 - Check to see that an IP address was served to the Ethernet port connected to the arm.<br><br> 3 - Check the link type.<br><br>If you have any questions about these settings, please contact [email protected] || [[image:RDS6_connection_check.png|600px]] | ||
| + | |- | ||
| + | | Click the RSx button. This button only appears if the laser scanner is switched on and connected. || [[image:RDS6_RSx_button.png|600px]] | ||
| + | |- | ||
| + | | Change to Advanced mode. This mode lets you edit the settings in this menu.|| [[image:RDS6_RSx_advanced.png|600px]] | ||
| + | |- | ||
| + | | For the RS5 scanner (not shown here), set all the values like you see here, then "Save As" in step 4 to save the "Scanning profile" - which means you are saving the scanning configuration.<br><br>For the RS6 or the AS1 scanner, reduce the Point sampling to as low as it can go (50%), then set the Exposure mode to SHINE. Also, do not reduce the angle of incidence value - or RDS will not allow you to scan around the edges of tube shapes.|| [[image:RDS6_RSx_setup.png|600px]] | ||
| + | |- | ||
| + | | Change to the Advanced settings menu. Unless you know you want this feature, disable the remote mouse.|| [[image:RDS6_RSx_advanced_remote_mouse.png|600px]] | ||
| + | |- | ||
| + | | Press save. || [[image:RDS6_RSx_save.png|600px]] | ||
| + | |- | ||
| + | | Press quit. || [[image:RDS6_RSx_quit.png|600px]] | ||
| + | |} | ||
| + | |||
| + | =HEXAGON RDS 5 Section= | ||
| + | |||
| + | ==How to Configure the RDS VERSION 5 Control Panel== | ||
| + | |||
<table width= 1000 > | <table width= 1000 > | ||
| + | |||
<tr cellpadding=10> | <tr cellpadding=10> | ||
<td width=300 valign=top> | <td width=300 valign=top> | ||
| − | + | Right click on the R icon in the System Tray. If it is not in the menu on the bottom right, then left click on "Show Hidden Icons" button in the System Tool Tray. Then right click on the R icon in that menu.<br><br> | |
| − | + | ||
| − | + | ||
| − | + | ||
| − | + | ||
| − | + | ||
</td> | </td> | ||
<td> | <td> | ||
| − | [[image: | + | [[image:Windows 10 System Tray R Icon.png|300px]]<br><br> |
</td> | </td> | ||
| − | |||
</tr> | </tr> | ||
| − | |||
| + | <tr cellpadding=10> | ||
| + | <td width=300 valign=top> | ||
| + | Left click on the Control Panel icon in the menu that pops up.<br><br></td> | ||
| + | <td> | ||
| + | [[image:RDS System Tray Panel Menu.png|300px]]<br><br> | ||
| + | </td> | ||
| + | |||
| + | </tr> | ||
| − | |||
| − | |||
| − | |||
<tr cellpadding=10> | <tr cellpadding=10> | ||
<td width=300 valign=top> | <td width=300 valign=top> | ||
| − | + | You may also see a menu like this one if you click on the R inside the right click menu. Click on the Control Panel icon in the popup menu.<br><br></td> | |
| − | + | <td> | |
| − | + | [[image:RDS popup Control Panel.png|300px]]<br><br> | |
| − | <br><br> | + | |
| − | + | ||
</td> | </td> | ||
| + | |||
| + | </tr> | ||
| + | |||
| + | <tr cellpadding=10> | ||
| + | <td width=300 valign=top> | ||
| + | Select any Control Panel menu with the buttons on the left to show different menus on the right.<br><br></td> | ||
<td> | <td> | ||
| − | [[image:RDS | + | [[image:RDS Control Panel Menu Buttons.png|300px]]<br><br> |
</td> | </td> | ||
</tr> | </tr> | ||
| − | |||
| − | |||
| − | |||
| − | + | </table> | |
| + | <br><br> | ||
| + | ==Recommended RDS Version 5 Control Panel Setup== | ||
| + | |||
<table width= 1000 > | <table width= 1000 > | ||
| − | |||
<tr cellpadding=10> | <tr cellpadding=10> | ||
<td width=300 valign=top> | <td width=300 valign=top> | ||
| − | + | This is how we recommend that you setup the RSx menu in the RDS Control Panel for VTube-LASER.<br><br>Click on the RSx menu button on the left to see these settings.<br><br> | |
| + | * Capture mode: Keep button pressed<br><br> | ||
| + | * Sound guide: Unchecked (OFF)<br><br> | ||
| + | * Point Sampling: 25% (or the lowest available)<br><br> | ||
| + | * Behavior when press the left and right buttons: Switch exposure mode<br><br> | ||
| + | * Exposure mode: Automatic<br><br> | ||
</td> | </td> | ||
<td> | <td> | ||
| − | [[image: | + | [[image:RDS Control Panel v5 - RSx Menu.png|700px]]<br><br> |
</td> | </td> | ||
| + | |||
</tr> | </tr> | ||
<tr cellpadding=10> | <tr cellpadding=10> | ||
<td width=300 valign=top> | <td width=300 valign=top> | ||
| − | + | To change any of these settings, you will need to change users from Standard mode to Advanced mode. Click on the Standard user button on the upper right corner, then change to Advanced mode by entering the password. The default password is "Advanced".<br><br> | |
| + | If you want to, you can save a custom profile (setup) as something like "VTube-LASER". | ||
| + | </td> | ||
<td> | <td> | ||
| − | [[image:RDS | + | [[image:RDS Control Panel v5 - RSx Menu - Advanced User.png|700px]]<br><br> |
</td> | </td> | ||
</tr> | </tr> | ||
| + | </table> | ||
| + | <br><br> | ||
| + | |||
| + | <table width= 1000 > | ||
<tr cellpadding=10> | <tr cellpadding=10> | ||
<td width=300 valign=top> | <td width=300 valign=top> | ||
| − | + | It is important to disable the Remote Mouse. Remote Mouse allows the arm to act as a mouse - which we do not recommend unless you know that you want to use the arm as a mouse and you know how it works.<br><br> | |
| + | </td> | ||
<td> | <td> | ||
| − | [[image:RDS | + | [[image:RDS Control Panel v5 - Advanced Settings Menu.png|700px]]<br><br> |
</td> | </td> | ||
</tr> | </tr> | ||
| + | </table> | ||
| + | <table width= 1000 > | ||
<tr cellpadding=10> | <tr cellpadding=10> | ||
<td width=300 valign=top> | <td width=300 valign=top> | ||
| − | + | When you make changes, RDS will allow you to save the RDS setup changes with a visible SAVE button on the bottom right corner. Click this button before you exit ("Quit") the Control Panel.<br><br> | |
| + | </td> | ||
<td> | <td> | ||
| − | [[image:RDS Control Panel | + | [[image:RDS Control Panel v5 - Save Button.png|700px]]<br><br> |
</td> | </td> | ||
</tr> | </tr> | ||
| + | </table> | ||
| + | <table width= 1000 > | ||
| + | <tr cellpadding=10> | ||
| + | <td width=300 valign=top> | ||
| + | Click the Quit button to close the Control Panel.<br><br> | ||
| + | </td> | ||
| + | <td> | ||
| + | [[image:RDS Control Panel v5 - Quit Button.png|700px]]<br><br> | ||
| + | </td> | ||
| − | + | </tr> | |
</table> | </table> | ||
| − | + | ||
| + | =HEXAGON RDS 4 Section= | ||
==How to Enter the RDS VERSION 4 Control Panel== | ==How to Enter the RDS VERSION 4 Control Panel== | ||
| Line 163: | Line 220: | ||
<br><br> | <br><br> | ||
| − | ==Recommended RDS Control Panel Setup== | + | ==Recommended RDS Version 4 Control Panel Setup== |
<table width= 1000 > | <table width= 1000 > | ||
| Line 314: | Line 371: | ||
* Back to [[VTube-LASER]] | * Back to [[VTube-LASER]] | ||
| − | * See | + | * See also [[RDS Versions for ROMER Scanners]] |
| + | * See [[HEXAGON Absolute Arm Feature Packs or Control Packs]] | ||
Latest revision as of 18:33, 3 October 2022
|
- Back to VTube-LASER
- See also RDS Versions for ROMER Scanners
- See HEXAGON Absolute Arm Feature Packs or Control Packs
About HEXAGON RDS ("ROMER Data Service") Software
|
HEXAGON RDS (from "ROMER Data Service") is a software system that connects software like VTube-LASER to any HEXAGON measuring device that uses the RDS.
|
HEXAGON RDS 6 Section
How to Configure the RDS VERSION 6.2 Control Panel
| Comment | Image |
|---|---|
| Left click on the up arrow in the system tool tray. Left click on the blue R. |

|
| Left click on the gear icon in the floating window. | 
|
| Click on Connection | 
|
| 1 - Check the instrument type. 2 - Check to see that an IP address was served to the Ethernet port connected to the arm. 3 - Check the link type. If you have any questions about these settings, please contact [email protected] |

|
| Click the RSx button. This button only appears if the laser scanner is switched on and connected. | 
|
| Change to Advanced mode. This mode lets you edit the settings in this menu. | 
|
| For the RS5 scanner (not shown here), set all the values like you see here, then "Save As" in step 4 to save the "Scanning profile" - which means you are saving the scanning configuration. For the RS6 or the AS1 scanner, reduce the Point sampling to as low as it can go (50%), then set the Exposure mode to SHINE. Also, do not reduce the angle of incidence value - or RDS will not allow you to scan around the edges of tube shapes. |

|
| Change to the Advanced settings menu. Unless you know you want this feature, disable the remote mouse. | 
|
| Press save. | 
|
| Press quit. | 
|
HEXAGON RDS 5 Section
How to Configure the RDS VERSION 5 Control Panel
|
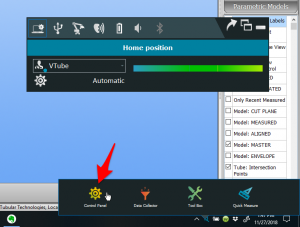
Right click on the R icon in the System Tray. If it is not in the menu on the bottom right, then left click on "Show Hidden Icons" button in the System Tool Tray. Then right click on the R icon in that menu. |
|
|
Left click on the Control Panel icon in the menu that pops up. |
|
|
You may also see a menu like this one if you click on the R inside the right click menu. Click on the Control Panel icon in the popup menu. |
|
|
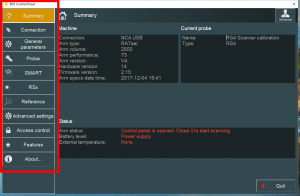
Select any Control Panel menu with the buttons on the left to show different menus on the right. |
Recommended RDS Version 5 Control Panel Setup
|
This is how we recommend that you setup the RSx menu in the RDS Control Panel for VTube-LASER.
|
|
|
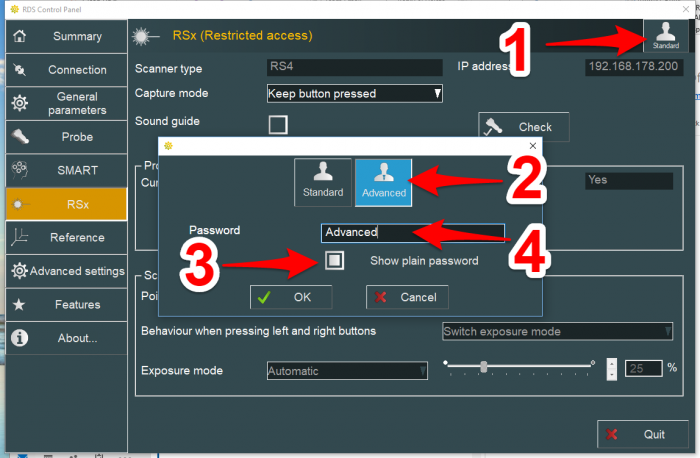
To change any of these settings, you will need to change users from Standard mode to Advanced mode. Click on the Standard user button on the upper right corner, then change to Advanced mode by entering the password. The default password is "Advanced". |
|
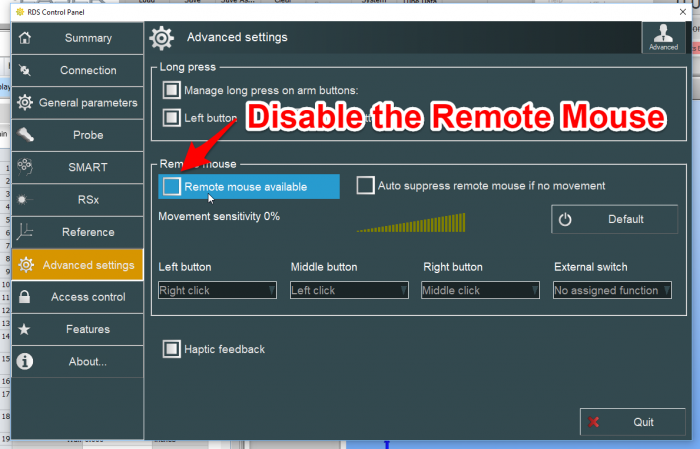
It is important to disable the Remote Mouse. Remote Mouse allows the arm to act as a mouse - which we do not recommend unless you know that you want to use the arm as a mouse and you know how it works. |
|
When you make changes, RDS will allow you to save the RDS setup changes with a visible SAVE button on the bottom right corner. Click this button before you exit ("Quit") the Control Panel. |
|
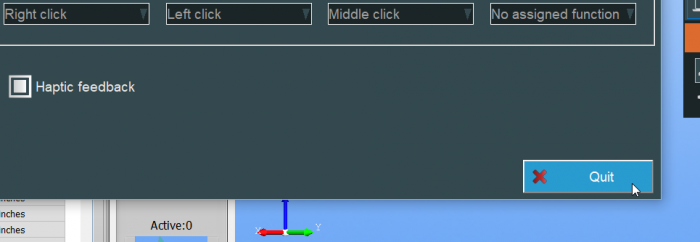
Click the Quit button to close the Control Panel. |
HEXAGON RDS 4 Section
How to Enter the RDS VERSION 4 Control Panel
|
Left click on "Show Hidden Icons" button in the System Tool Tray. |
|
|
Right click on the measuring center icon. |
|
|
Left click on the RDS Control Panel in the popup menu. |
|
|
Select any Control Panel menu with the buttons on the left. |
Recommended RDS Version 4 Control Panel Setup
|
This is how we recommend that you setup the RSx menu in the RDS Control Panel for VTube-LASER.
|
|
|
To change any of these settings, you will need to change users from Standard mode to Advanced mode. Click on the Standard user button on the upper right corner, then change to Advanced mode by entering the password. The default password is "Advanced". |
|
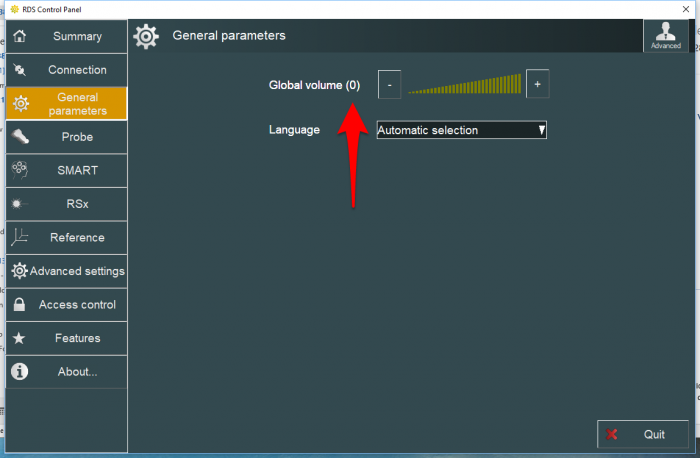
We recommend that you turn the ROMER sound off in General parameters. |
ROMER Ball Probe Support
|
All ball probe systems on devices that run through RDS are compatible with VTube-LASER. (VTube-LASER can use the LASER or the ball probe.) |
ROMER Driver Downloads
Download the latest tested ROMER RDS driver from this page: Advanced Tubular ROMER Driver Support Page. |
How to Determine Your Current RDS 4.X Version
|
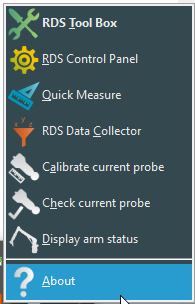
Left click on the System Tray icon. |
|
|
Right click on the measuring center icon. |
|
|
Left click on About. |
|
|
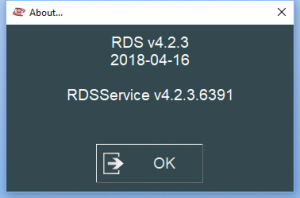
The RDS About window will display. |
RDS Performance Notes
|
When idling, the RDS service requires only 1 to 5 percent of the CPU usage. |
|
You can watch the CPU usage in the Windows Task Manager. |

