Difference between revisions of "VTube NUMALLIANCE Bender Correction"
(→NUMALLIANCE CORRECTIONS) |
(→STEP 9) |
||
| (13 intermediate revisions by one user not shown) | |||
| Line 24: | Line 24: | ||
<td width=300> | <td width=300> | ||
| − | VTube-LASER has an export option for NUMALLIANCE | + | VTube-LASER has an export option for NUMALLIANCE MES files that are used to correct the NUMALLIANCE benders.<br><br> |
Note: NUMALLIANCE benders only require the ''measured'' data for corrections.<br><br> | Note: NUMALLIANCE benders only require the ''measured'' data for corrections.<br><br> | ||
Measure the tube in VTube-LASER, then send the MEASURED tube data to the bender control, and it will then perform the correction. | Measure the tube in VTube-LASER, then send the MEASURED tube data to the bender control, and it will then perform the correction. | ||
<br><br> | <br><br> | ||
| − | Follow the steps below | + | Follow the steps below. |
</td> | </td> | ||
| Line 46: | Line 46: | ||
<td width=300> | <td width=300> | ||
| − | These steps assume that you have measured the tube and have | + | Press the Bender Setup button. (These steps assume that you have measured the tube and have setup VTube-LASER with the NUMALLIANCE protocol.) |
</td> | </td> | ||
<td> | <td> | ||
| − | [[image: | + | [[image:Numalliance1.png|800px]] |
</td> | </td> | ||
</tr> | </tr> | ||
| Line 57: | Line 57: | ||
</table> | </table> | ||
<br><br> | <br><br> | ||
| − | |||
| − | |||
==STEP 2== | ==STEP 2== | ||
| Line 66: | Line 64: | ||
<td width=300> | <td width=300> | ||
| − | + | Set the bender number. It should say NUMALLIANCE like shown here. | |
| + | <br><br> | ||
| + | If the data in the window is not correct, then import the data from the main VTube-LASER memory by clicking on "Setup this Window" then clicking on "Copy Master LRA to Setup LRA". | ||
| + | <br><br> | ||
| + | In the "Correct the Bender" menu, click on Auto Send. | ||
| + | <br><br> | ||
| + | A save file dialog will open and allow you to name the MES file on a thumb drive or on the network. This file will be imported into the NUMALLIANCE control. | ||
</td> | </td> | ||
<td> | <td> | ||
| − | [[image: | + | [[image:Numalliance2.png|800px]] |
</td> | </td> | ||
</tr> | </tr> | ||
| Line 77: | Line 81: | ||
</table> | </table> | ||
<br><br> | <br><br> | ||
| − | |||
==STEP 3== | ==STEP 3== | ||
| Line 85: | Line 88: | ||
<td width=300> | <td width=300> | ||
| − | + | At the NUMALLIANCE control, press the CAD button. | |
| + | <br><br> | ||
</td> | </td> | ||
<td> | <td> | ||
| − | [[image: | + | [[image:NumallianceCADbutton.png|800px]] |
</td> | </td> | ||
</tr> | </tr> | ||
| Line 96: | Line 100: | ||
</table> | </table> | ||
<br><br> | <br><br> | ||
| − | |||
==STEP 4== | ==STEP 4== | ||
| Line 104: | Line 107: | ||
<td width=300> | <td width=300> | ||
| − | + | Press the XYZ/LRA button.<br><br> | |
</td> | </td> | ||
<td> | <td> | ||
| − | [[image: | + | [[image:NumallianceXYZLRA.png|800px]] |
</td> | </td> | ||
</tr> | </tr> | ||
| Line 121: | Line 124: | ||
<td width=300> | <td width=300> | ||
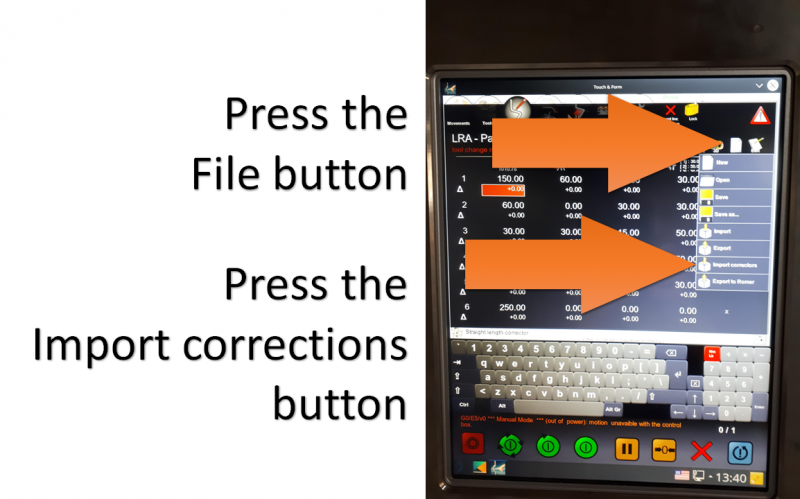
| − | + | Press the File button. | |
<br><br> | <br><br> | ||
| − | + | Press the Import corrections button. | |
</td> | </td> | ||
<td> | <td> | ||
| − | [[image: | + | [[image:NumallianceFileAndImport.png|800px]] |
</td> | </td> | ||
</tr> | </tr> | ||
| Line 141: | Line 144: | ||
<td width=300> | <td width=300> | ||
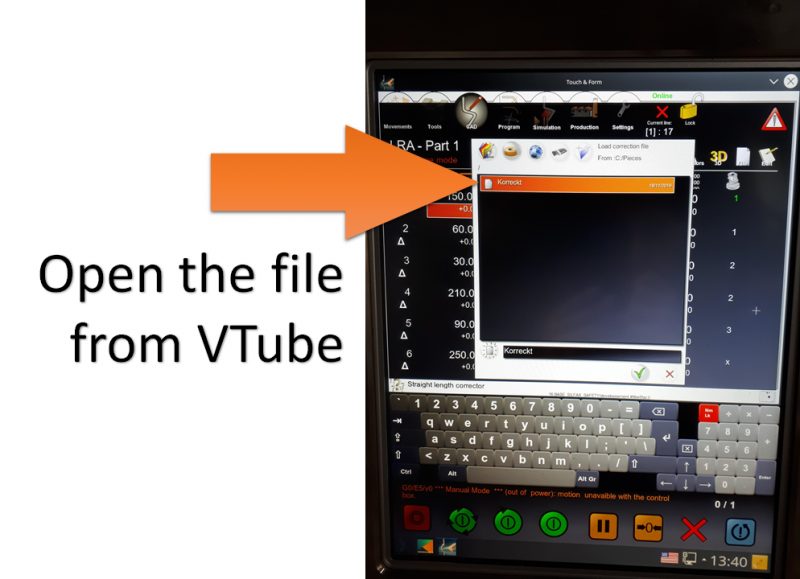
| − | + | Open the file from VTube. | |
| − | + | ||
| − | + | ||
| − | + | ||
| − | + | ||
| − | + | ||
| − | + | ||
| − | + | ||
| − | + | ||
| − | + | ||
| − | + | ||
| − | + | ||
| − | + | ||
| − | + | ||
| − | + | ||
| − | + | ||
| − | + | ||
| − | + | ||
| − | + | ||
| − | + | ||
| − | + | ||
| − | + | ||
| − | + | ||
| − | + | ||
| − | + | ||
| − | + | ||
| − | + | ||
| − | + | ||
| − | + | ||
| − | + | ||
| − | + | ||
| − | + | ||
| − | + | ||
| − | + | ||
| − | + | ||
| − | + | ||
| − | + | ||
| − | + | ||
| − | + | ||
| − | + | ||
| − | + | ||
| − | + | ||
| − | + | ||
| − | + | ||
| − | + | ||
| − | + | ||
| − | + | ||
| − | + | ||
| − | + | ||
| − | + | ||
| − | + | ||
| − | + | ||
| − | + | ||
| − | + | ||
| − | + | ||
| − | + | ||
</td> | </td> | ||
<td> | <td> | ||
| − | [[image: | + | [[image:NumallianceOpenMESfile.png|800px]] |
</td> | </td> | ||
</tr> | </tr> | ||
Latest revision as of 23:29, 25 November 2019
|
This page describes how to use VTube-LASER to correct NUMALLIANCE benders. |
Back to VTube-LASER
Contents |
NUMALLIANCE CORRECTIONS
|
VTube-LASER has an export option for NUMALLIANCE MES files that are used to correct the NUMALLIANCE benders. |
STEP 1
|
Press the Bender Setup button. (These steps assume that you have measured the tube and have setup VTube-LASER with the NUMALLIANCE protocol.) |
STEP 2
|
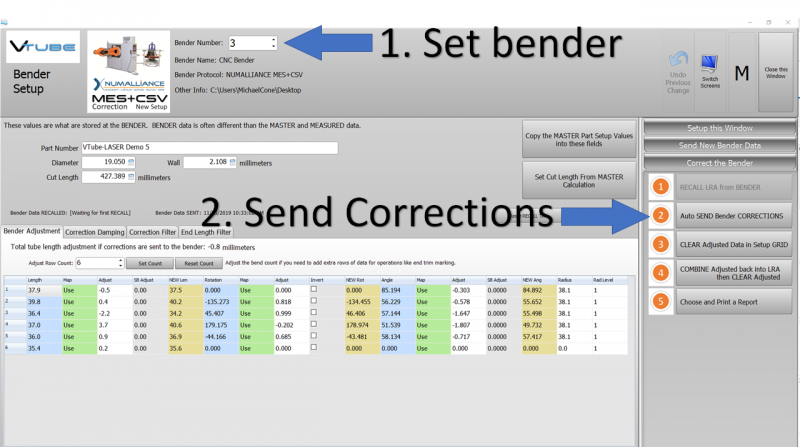
Set the bender number. It should say NUMALLIANCE like shown here.
|
STEP 3
|
At the NUMALLIANCE control, press the CAD button.
|
STEP 4
|
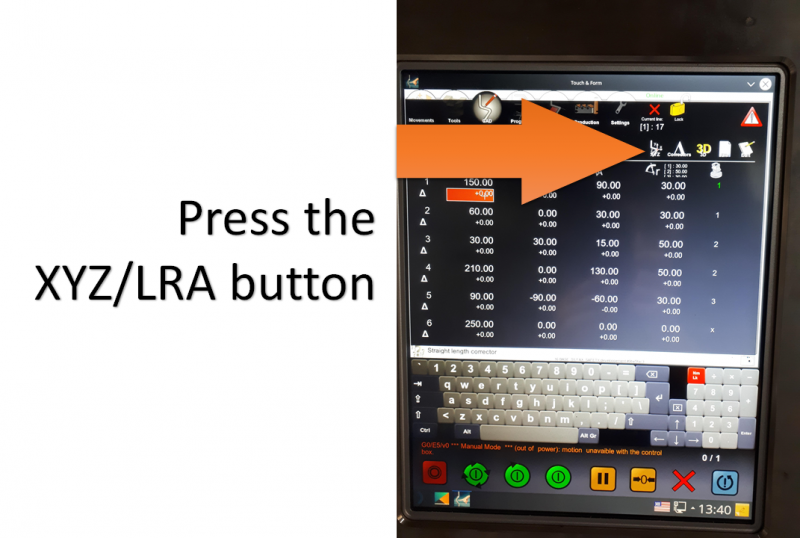
Press the XYZ/LRA button. |
STEP 5
|
Press the File button.
|
STEP 6
|
Open the file from VTube. |
Other Pages
- See VTube-LASER
- See VTube-STEP
