Difference between revisions of "VTube-LASER v2.9.17"
(→Measure Setup - "Other" Menu) |
(→25pxOther Changes) |
||
| (61 intermediate revisions by one user not shown) | |||
| Line 5: | Line 5: | ||
| − | == | + | ==Version 2.9.17== |
| − | Release Date: | + | Release Date: January 17, 2019<br> |
| − | Current Build: | + | Current Build: 42 |
* Back to [[VTube-LASER]] | * Back to [[VTube-LASER]] | ||
| Line 39: | Line 39: | ||
<td> | <td> | ||
| − | [[image:vtl_v2.9.17_MeasureGuideWindow.png| | + | [[image:vtl_v2.9.17_MeasureGuideWindow.png|600px]] |
</td> | </td> | ||
| Line 52: | Line 52: | ||
<td> | <td> | ||
| − | [[image:vtl_v2.9.17_MeasureGuideWindow_MultiScan.png| | + | [[image:vtl_v2.9.17_MeasureGuideWindow_MultiScan.png|600px]] |
</td> | </td> | ||
| Line 69: | Line 69: | ||
<td> | <td> | ||
| − | [[image:vtl_v2.9.17_MeasureGuideWindow_Resize.png| | + | [[image:vtl_v2.9.17_MeasureGuideWindow_Resize.png|600px]] |
</td> | </td> | ||
| Line 87: | Line 87: | ||
<td> | <td> | ||
| − | [[image:vtl_v2.9.17_MeasureGuideWindow_MonitorTracking.png| | + | [[image:vtl_v2.9.17_MeasureGuideWindow_MonitorTracking.png|600px]] |
</td> | </td> | ||
| Line 102: | Line 102: | ||
<td> | <td> | ||
| − | [[image:vtl_v2.9.17_MeasureGuideWindow_Setup.png| | + | [[image:vtl_v2.9.17_MeasureGuideWindow_Setup.png|600px]] |
</td> | </td> | ||
| Line 112: | Line 112: | ||
<td width=300> | <td width=300> | ||
| − | ===Automatic Display of | + | ==="Automatic Display of MASTER" Option=== |
In the Measure Setup - "Other" menu, use this option to indicate that VTube-LASER should automatically display the Measure Guide window when you are measuring tube shapes.<br><br> | In the Measure Setup - "Other" menu, use this option to indicate that VTube-LASER should automatically display the Measure Guide window when you are measuring tube shapes.<br><br> | ||
</td> | </td> | ||
<td> | <td> | ||
| − | [[image:vtl_v2.9.17_MeasureGuideWindow_AutomaticDisplayOfMaster.png| | + | [[image:vtl_v2.9.17_MeasureGuideWindow_AutomaticDisplayOfMaster.png|600px]] |
</td> | </td> | ||
| Line 123: | Line 123: | ||
</table> | </table> | ||
| + | |||
| + | <br><br> | ||
| + | |||
| + | ==[[image:Check.jpg|25px]]NEW - Super fast AUTOBUILD PARAMETRIC Import of Solid Models == | ||
| + | |||
| + | <table cellpadding=10 width=1200> | ||
| + | |||
| + | <tr valign=top> | ||
| + | <td width=300> | ||
| + | [[image:Vts_v2.9.17_autobuildparametrics_icon.png|300px]]<br><br> | ||
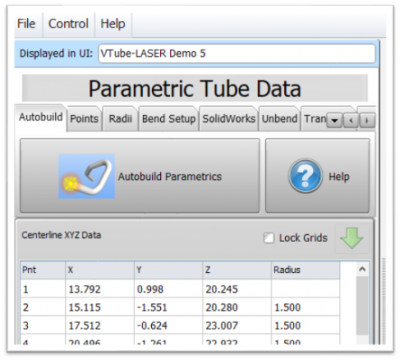
| + | The new Autobuild Parametrics feature speeds up importing and calculating centerline and bender data parametrics by 5 times or more by automating the calculation process with a single button press.<br><br> | ||
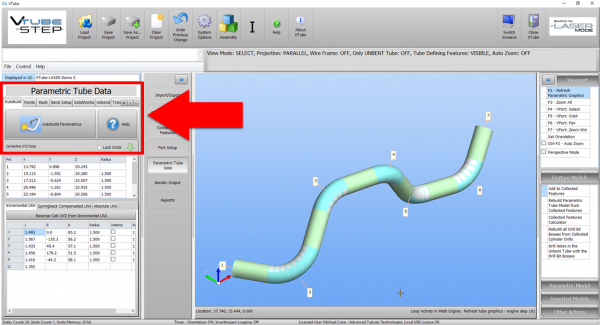
| + | The new Autobuild Parametrics button is in the Parametric Tube Data menu.<br><br> | ||
| + | Autobuild will automatically attempt to calculate the centerline from the imported STEP or IGES model. For Autobuild to work, it needs to follow these rules about the incoming model. | ||
| + | </td> | ||
| + | <td> | ||
| + | [[image:vts_v2.9.17_autobuildparametrics.png|400px]] | ||
| + | </td> | ||
| + | </tr> | ||
| + | |||
| + | |||
| + | <tr valign=top> | ||
| + | <td width=300> | ||
| + | ===The Rules for Autobuild=== | ||
| + | |||
| + | * The model should be a single clean tube.<br><br> | ||
| + | * The model should formed as a segmented tube shape made up of cylinders and truncated-tori.<br><br> | ||
| + | * Remove all other geometry first.<br><br> | ||
| + | * The following are either handled or ignored:<br><br> | ||
| + | |||
| + | # Inner walls are used to determine the wall thickness<br><br> | ||
| + | # End wall rings are ignored<br><br> | ||
| + | # Non-surface data, like lines and points are ignored<br><br> | ||
| + | |||
| + | </td> | ||
| + | <td> | ||
| + | [[image:vts_v2.9.17_Autobuild Parametric Screen Capture With Arrow.png|600px]] | ||
| + | </td> | ||
| + | </tr> | ||
| + | |||
| + | |||
| + | <tr valign=top> | ||
| + | <td width=300> | ||
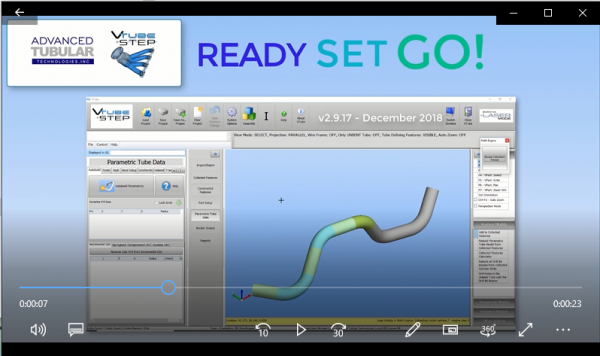
| + | ===Video=== | ||
| + | |||
| + | Click on the video image to see a video of the Autobuild Parametrics feature working. | ||
| + | |||
| + | </td> | ||
| + | <td> | ||
| + | [[image:vts_v2.9.17_Autobuild Parametric Video.png|600px|link=https://www.advancedtubular.com/vtube-step/vts_v2.9.17_autobuild_parametrics_quick.mp4]]<br><br> | ||
| + | </td> | ||
| + | </tr> | ||
| + | |||
| + | |||
| + | |||
| + | </table> | ||
| + | |||
<br><br> | <br><br> | ||
| Line 145: | Line 201: | ||
* Point clouds are stored and recalled to/from the VTube-LASER project file. | * Point clouds are stored and recalled to/from the VTube-LASER project file. | ||
* Point cloud changes are stored in the UNDO memory. If you delete the wrong set of points - just press UNDO. | * Point cloud changes are stored in the UNDO memory. If you delete the wrong set of points - just press UNDO. | ||
| − | * Set the color of each bucket of point clouds. | + | * Set the color of each bucket of point clouds.<br><br> |
| + | |||
| + | [[image:vtl_v2.9.17_bucketlist.png|300px]] | ||
| Line 151: | Line 209: | ||
<td> | <td> | ||
| − | [[image:vtl_v2.9.17_PointCloudDimension.png| | + | [[image:vtl_v2.9.17_Point_CloudScanning_Logo.png|600px]]<br><br> |
| + | [[image:vtl_v2.9.17_PointCloudScanToSOLIDWORKS.png|600px]]<br><br> | ||
| + | [[image:vtl_v2.9.17_PointCloudDimension.png|600px]]<br><br> | ||
| + | |||
</td> | </td> | ||
| Line 169: | Line 230: | ||
<td> | <td> | ||
| − | [[image:vtl_v2.9.17_MalibuControlArm_scanningVideo.png| | + | [[image:vtl_v2.9.17_MalibuControlArm_scanningVideo.png|600px]]<br><br> |
| − | [[image:vtl_v2.9.17_MalibuControlArm.png| | + | [[image:vtl_v2.9.17_MalibuControlArm.png|600px]] |
</td> | </td> | ||
| Line 185: | Line 246: | ||
<td> | <td> | ||
| − | [[image:vtl_v2.9.17_MalibuControlArm_SWpointcloud.png| | + | [[image:vtl_v2.9.17_MalibuControlArm_SWpointcloud.png|600px]] |
</td> | </td> | ||
| Line 199: | Line 260: | ||
<td> | <td> | ||
| − | [[image:vtl_v2.9.17_MalibuControlArm_SWmesh.png| | + | [[image:vtl_v2.9.17_MalibuControlArm_SWmesh.png|600px]] |
</td> | </td> | ||
| Line 217: | Line 278: | ||
<td> | <td> | ||
| − | [[image:vtl_v2.9.17_SetupMeasureResetStraightCount.png| | + | [[image:vtl_v2.9.17_SetupMeasureResetStraightCount.png|600px]] |
</td> | </td> | ||
| Line 226: | Line 287: | ||
<br><br> | <br><br> | ||
| − | ==[[image:Check.jpg|25px]]NEW - | + | ==[[image:Check.jpg|25px]]NEW - Change Cylinder Fit Tolerances from a List of Setups == |
<table cellpadding=10 width=1200> | <table cellpadding=10 width=1200> | ||
| Line 241: | Line 302: | ||
<td> | <td> | ||
| − | [[image:vtl_v2.9.17_Measure1NamedSetups.png| | + | [[image:vtl_v2.9.17_Measure1NamedSetups.png|600px]] |
</td> | </td> | ||
| Line 283: | Line 344: | ||
<td> | <td> | ||
| − | [[image:vtl_v2.9.17_180degreeSplitBend_BenderSetupCorrectionFix.png| | + | [[image:vtl_v2.9.17_180degreeSplitBend_BenderSetupCorrectionFix.png|600px]] |
</td> | </td> | ||
| Line 302: | Line 363: | ||
<td> | <td> | ||
| − | [[image:vtl_v2.9.17_DRO.png| | + | [[image:vtl_v2.9.17_DRO.png|600px]] |
| + | </td> | ||
| + | |||
| + | </tr> | ||
| + | |||
| + | </table> | ||
| + | |||
| + | <br><br> | ||
| + | |||
| + | ==[[image:Check.jpg|25px]]ENHANCED - PATH MANAGER - Clear Paths That No Longer Exist in the Path Manager == | ||
| + | |||
| + | <table cellpadding=10 width=1400> | ||
| + | <tr valign=top> | ||
| + | |||
| + | <td width=300> | ||
| + | The new command allows you to clear paths that no longer exist in the list of Path Manager. | ||
| + | |||
| + | </td> | ||
| + | |||
| + | <td> | ||
| + | [[image:vts_2.9.17_pathmanager_new.png|600px]] | ||
| + | </td> | ||
| + | |||
| + | </tr> | ||
| + | |||
| + | </table> | ||
| + | <br><br> | ||
| + | |||
| + | ==[[image:Check.jpg|25px]]ENHANCED - Configure the PATH MANAGER == | ||
| + | |||
| + | <table cellpadding=10 width=1400> | ||
| + | <tr valign=top> | ||
| + | |||
| + | <td width=300> | ||
| + | Now you can configure the Path Manager without importing or loading any files.<br><br> | ||
| + | Load the Path Manager by pressing the "Configure the Path Manager" button in the System Options / File Setup menu.<br><br> | ||
| + | </td> | ||
| + | |||
| + | <td> | ||
| + | [[image:vts_2.9.17_pathmanager_setup.png|600px]] | ||
| + | </td> | ||
| + | |||
| + | </tr> | ||
| + | |||
| + | </table> | ||
| + | <br><br> | ||
| + | |||
| + | ==[[image:Check.jpg|25px]]NEW - Radius 2 and Radius 3 after the Default Radius field in Part Setup == | ||
| + | |||
| + | <table cellpadding=10 width=1400> | ||
| + | <tr valign=top> | ||
| + | |||
| + | <td width=300> | ||
| + | VTube has an added Radius 2 and Radius 3 fields in Part Setup and Bender Setup to allow for easier conversion to benders that require radius values assigned to levels (like Eaton Leonard and YSE)<br><br> | ||
| + | </td> | ||
| + | |||
| + | <td> | ||
| + | [[image:vts_2.9.17_rad2_rad3_setup.png|600px]] | ||
| + | </td> | ||
| + | |||
| + | </tr> | ||
| + | |||
| + | </table> | ||
| + | <br><br> | ||
| + | |||
| + | |||
| + | ==[[image:Check.jpg|25px]]NEW - Collected Features Menu Fine-tuned with New Buttons (STEP Mode) == | ||
| + | |||
| + | <table cellpadding=10 width=1400> | ||
| + | <tr valign=top> | ||
| + | |||
| + | <td width=300> | ||
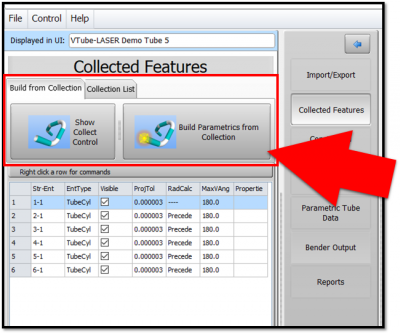
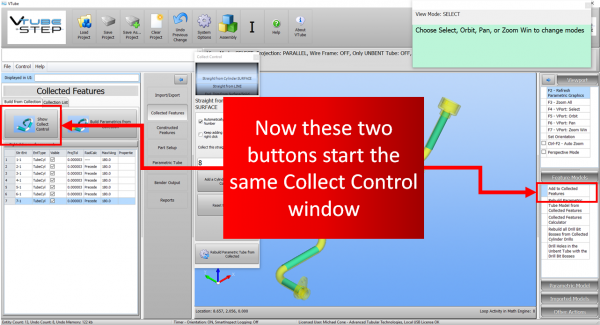
| + | We found that users intuitively seek to use the Collected Features menu on the left of the screen to start the collection process.<br><br> | ||
| + | Since that is intuitive to users, and is consistent with our menu design, we placed buttons in that menu that allow users to show the Collect Features control window. | ||
| + | |||
| + | </td> | ||
| + | |||
| + | <td> | ||
| + | [[image:vts_2.9.17_collectfeaturesmenu_new.png|400px]]<br><br> | ||
| + | [[image:vts_2.9.17_collectfeaturesmenu_whoscreen_compare.png|600px]]<br><br> | ||
| + | </td> | ||
| + | |||
| + | </tr> | ||
| + | |||
| + | </table> | ||
| + | <br><br> | ||
| + | |||
| + | |||
| + | ==[[image:Check.jpg|25px]]NEW - BLM VGP-3D Bender Data Reports == | ||
| + | |||
| + | <table cellpadding=10 width=1400> | ||
| + | <tr valign=top> | ||
| + | |||
| + | <td width=300> | ||
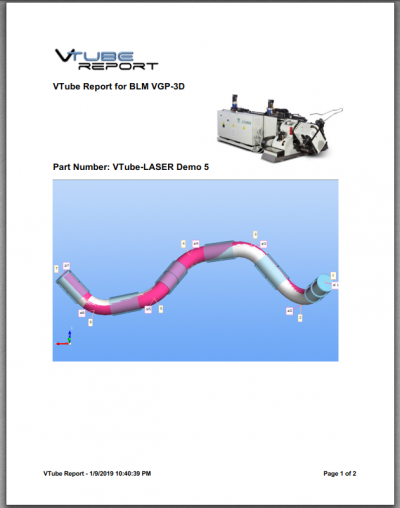
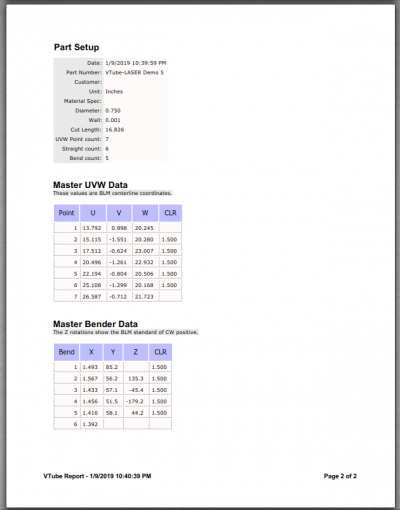
| + | This version now has a BLM VGP-3D bender data report with CW positive rotations. | ||
| + | <br><br> | ||
| + | Download the [https://www.advancedtubular.com/vtube-laser/VTUBE%20BLM%20VGP-3D%20Report.pdf PDF Report] | ||
| + | </td> | ||
| + | |||
| + | <td> | ||
| + | [[image:blm-vgp3d-report1.png|400px]] | ||
| + | [[image:blm-vgp3d-report2.png|400px]]<br><br> | ||
| + | </td> | ||
| + | |||
| + | </tr> | ||
| + | |||
| + | </table> | ||
| + | <br><br> | ||
| + | |||
| + | |||
| + | ==[[image:Check.jpg|25px]]NEW - Collect Control Changes (STEP Mode) == | ||
| + | |||
| + | <table cellpadding=10 width=1200> | ||
| + | |||
| + | <tr valign=top> | ||
| + | <td width=300> | ||
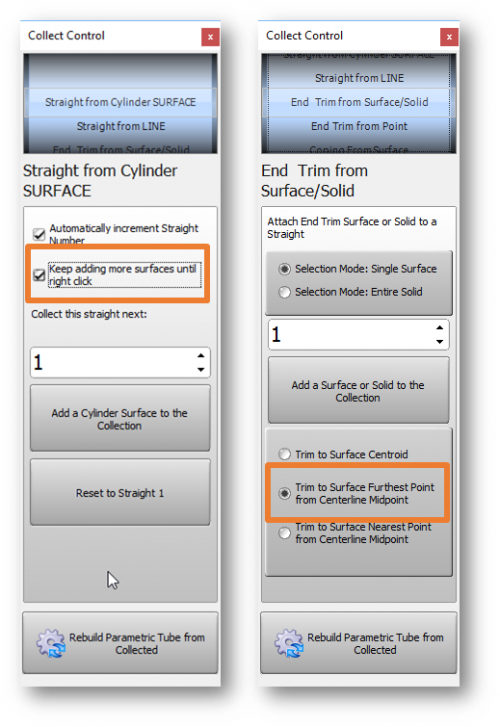
| + | 1) "Keep adding more surfaces" is now true by default.<br><br> | ||
| + | 2) End Trim from Surface now uses the middle radio button choice by default: Trim to Surface Furthest Point from Centerline Midpoint.<br><br> | ||
| + | </td> | ||
| + | <td> | ||
| + | [[image:vts_v2.9.18_CollectControl_Changes.png|500px]] | ||
| + | </td> | ||
| + | </tr> | ||
| + | |||
| + | </table> | ||
| + | |||
| + | |||
| + | <br><br> | ||
| + | |||
| + | |||
| + | ==[[image:Check.jpg|25px]]NEW - Popup Menu for Setting Precision Weights == | ||
| + | |||
| + | <table cellpadding=10 width=1200> | ||
| + | <tr valign=top> | ||
| + | |||
| + | <td width=300> | ||
| + | We added this new popup menu to make setting the Precision Weight values quicker. </td> | ||
| + | |||
| + | <td> | ||
| + | [[image:vtl_v2.9.18_PrecisionWeightControlPopup.png|400px]] | ||
</td> | </td> | ||
| Line 316: | Line 516: | ||
* In VTube-STEP, the export html report feature would display an error and would not save he html reports. This has been fixed. | * In VTube-STEP, the export html report feature would display an error and would not save he html reports. This has been fixed. | ||
* Auto disconnect without critical error or crash when FARO driver stops answering VTube-LASER's requests for information. | * Auto disconnect without critical error or crash when FARO driver stops answering VTube-LASER's requests for information. | ||
| − | + | * A change allows for hardware keys (dongles) with serial numbers greater than 2.147 billion. Older revisions may not read new hardware key serial numbers properly if they exceed that value. This version addresses that issue. | |
| + | * The Language Editor reloads from the main user interface much faster than previous versions. (Build 32) | ||
| + | * Optimized the STEP mode and LASER mode default settings to make VTube faster in its default state. (Build 33) | ||
| + | * Fixed show unbend only in STEP mode (Build 39) | ||
| + | * Measure guide viewport window does not display when the MASTER tube point count is 0. | ||
| + | * Fixed connection to the FARO driver for older Edge arms | ||
| + | * Added DOCS file import file checks | ||
| + | * This version was modified to run with FARO driver version 6.2.1.9 | ||
<br><br> | <br><br> | ||
Latest revision as of 20:38, 24 July 2019
|
Version 2.9.17Release Date: January 17, 2019
|
 NEW - Floating Measure Guide Window
|
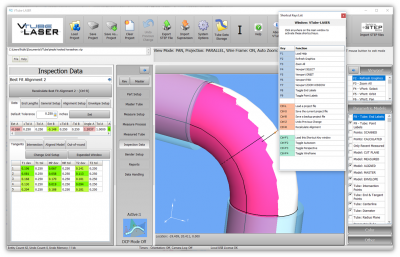
The new Measure Guide window draws a small model of the part with the current section highlighted with a color band. This will help you visually identify which part of the tube to measure next. This feature has an on/off switch in Measure Setup / Other. Also, you can view the window at any time from inside Measure Process Measure a tube. |
|
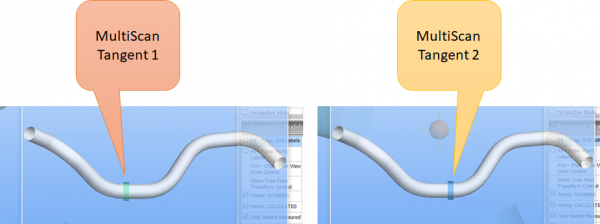
In MultiScan ModeThe feature works for either UniScan and MultiScan. For UniScan, the entire straight is banded. For MultiScan, the tangents of the straights are banded. |
|
Resizable WindowThe window is resizable. |
|
Multi-monitor SupportThe Measure Guide window can be moved to other monitors. |
|
Measure Guide Window SetupSetup the window in the Measure Process / Measure Tube option. |
|
"Automatic Display of MASTER" OptionIn the Measure Setup - "Other" menu, use this option to indicate that VTube-LASER should automatically display the Measure Guide window when you are measuring tube shapes. |
 NEW - Super fast AUTOBUILD PARAMETRIC Import of Solid Models
 NEW - Scan Point Clouds into SOLIDWORKS
|
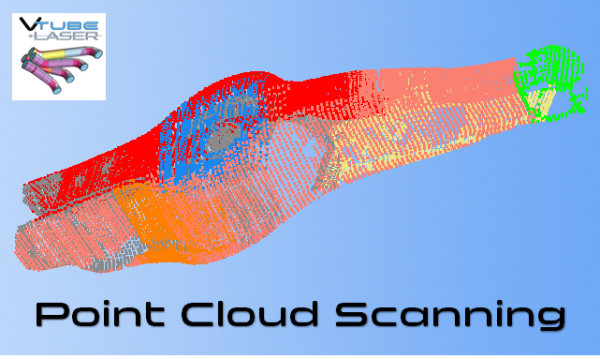
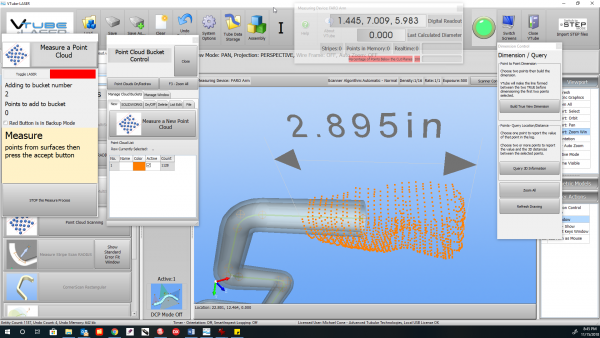
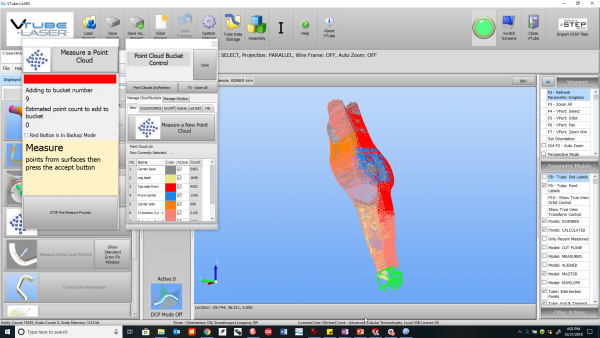
VTube-LASER now handles point clouds in storage we call "buckets." This allows you to scan anything into VTube-LASER - not just tubes. With this feature:
|
|
Scanning Test: Malibu Control ArmThis is a Malibu Control Arm that we scanned in VTube-LASER.
|
|
Send to SOLIDWORKSPress one button to transfer the scanned point cloud to SOLIDWORKS. The transfer takes about 5 seconds. |
|
Convert to SOLIDWORKS MeshUse the SOLIDWORKS features to turn the point cloud into a mesh and surface. (This requires a Professional or Premium license of SW.) |
 NEW - VTube-LASER Now Automatically Resets Straight Count at Measure
|
VTube-LASER users are used to editing from a "0" for starting straight count to some positive value. You won't have to do that any more in this new version - because now VTube will just fill in the correct straight count for you. You can still change it manually at any time. |
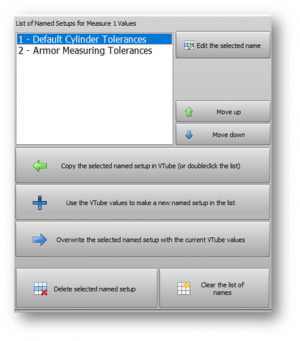
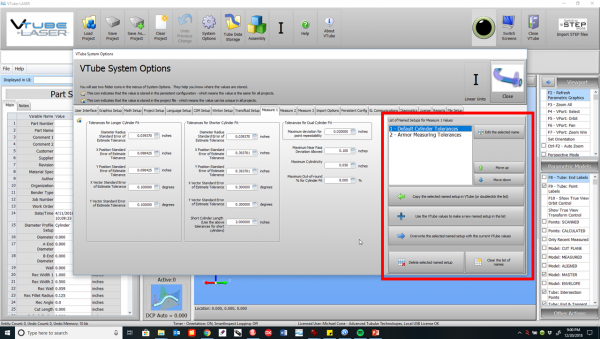
 NEW - Change Cylinder Fit Tolerances from a List of Setups
|
The new Cylinder Fit Tolerances Named Setup feature allows you to switch between stored cylinder fit tolerances for measuring cylinders. |
 NEW - MAX Points for Cylinder Stripes Is Now 50
|
After extensive testing, we've concluded that any point count above 50 per stripe is never helpful in VTube-LASER. For example, as you approach 1000 points per stripe, it slows the math engine significantly and actually causes more Cylinder Fit problems than it solves. |
 FIX - 180-degree Bend Correction Feature
|
This is important to you if you correct benders with 180-degree bends using Bender Setup communications. |
 NEW- Auto Display of DRO (Digital Readout) When Moving from VTube-STEP to VTube-LASER
|
When the arm is connected to VTube, and the user changes from VTube-STEP to VTube-LASER, VTube now automatically displays the DRO window (Digital Readout). |
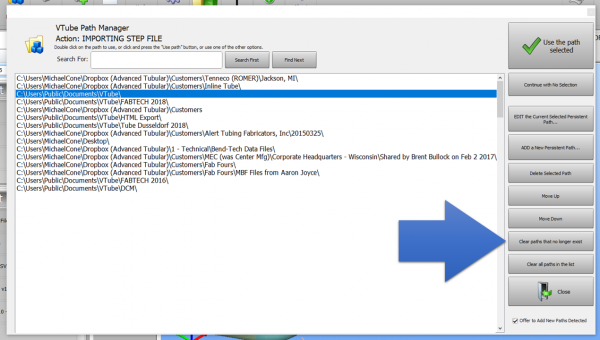
 ENHANCED - PATH MANAGER - Clear Paths That No Longer Exist in the Path Manager
|
The new command allows you to clear paths that no longer exist in the list of Path Manager. |
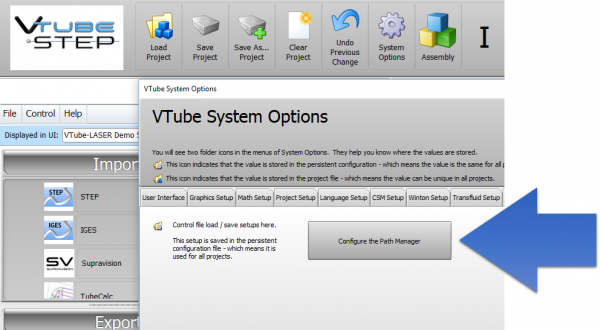
 ENHANCED - Configure the PATH MANAGER
|
Now you can configure the Path Manager without importing or loading any files. |
 NEW - Radius 2 and Radius 3 after the Default Radius field in Part Setup
|
VTube has an added Radius 2 and Radius 3 fields in Part Setup and Bender Setup to allow for easier conversion to benders that require radius values assigned to levels (like Eaton Leonard and YSE) |
 NEW - Collected Features Menu Fine-tuned with New Buttons (STEP Mode)
|
We found that users intuitively seek to use the Collected Features menu on the left of the screen to start the collection process. |
 NEW - BLM VGP-3D Bender Data Reports
|
This version now has a BLM VGP-3D bender data report with CW positive rotations.
|
 NEW - Collect Control Changes (STEP Mode)
|
1) "Keep adding more surfaces" is now true by default. |
 NEW - Popup Menu for Setting Precision Weights
| We added this new popup menu to make setting the Precision Weight values quicker. |
 Other Changes
- For HTML reports, the screen-image bmp file is now only copied to the html export folder when it is present in the html report.
- In VTube-STEP, the export html report feature would display an error and would not save he html reports. This has been fixed.
- Auto disconnect without critical error or crash when FARO driver stops answering VTube-LASER's requests for information.
- A change allows for hardware keys (dongles) with serial numbers greater than 2.147 billion. Older revisions may not read new hardware key serial numbers properly if they exceed that value. This version addresses that issue.
- The Language Editor reloads from the main user interface much faster than previous versions. (Build 32)
- Optimized the STEP mode and LASER mode default settings to make VTube faster in its default state. (Build 33)
- Fixed show unbend only in STEP mode (Build 39)
- Measure guide viewport window does not display when the MASTER tube point count is 0.
- Fixed connection to the FARO driver for older Edge arms
- Added DOCS file import file checks
- This version was modified to run with FARO driver version 6.2.1.9
Other Pages
- See VTube-LASER Addata ZModem Communications Protocol for more information.
- Back to VTube-LASER
- Back to VTube Software Updates (for LASER Mode)
- See also VTube-STEP
- See also VTube-STEP Revisions
- See VTube-LASER Customer Support Page to download the latest version.
- See the tutorial on DCF - Dual Cylinder Fit
- See the tutorial on DCP - Diameter Cut Planes
- See VTube-LASER Cut Planes
- See How to Measure Tubes Attached to an Evaporator with the DCP Feature

