Difference between revisions of "How to Reverse Engineer with Split Bend"

From ATTWiki
Jump to: navigation, search
(STEP 4: Measure The Part)
(Move the Tube During Measure)
Line 83: Line 83:
 
<td width=400 >
 
<td width=400 >
 
[[image:vtube-laser-v2.2_measureguide_cylindricaltube.png]]<br>
 
[[image:vtube-laser-v2.2_measureguide_cylindricaltube.png]]<br>
</td>
 
</tr>
 
</table>
 
 
== Move the Tube During Measure ==
 
<table cellpadding=10 width="900">
 
<tr valign=top>
 
<td width=400 >
 
It is also possible to move the tube if you attach the targets securely to the tube, then use the leapfrog feature.  For example, you can use a standard metal spring clamp to attach to the tube, then place the magnetic target on the clamp handle.<br><br>
 
 
===The Steps for Tube Move===
 
 
[[image:orangecircle_number1.png]] Place at least 3 targets on the tube.  The three targets should not form a single line.<br><br>
 
[[image:orangecircle_number2.png]] Press the LEAP button in the guide window on the left.<br><br>
 
[[image:orangecircle_number3.png]] Measure the targets with the ball probe.  Press the green button to measure each target.<br><br>
 
[[image:orangecircle_number4.png]] Press the red button to finish the initial measure.<br><br>
 
[[image:orangecircle_number5.png]] Move the tube and the targets to the new position relative to the arm.<br><br>
 
[[image:orangecircle_number6.png]] Measure the targets with the ball probe.  Press the green button to measure each target.<br><br>
 
[[image:orangecircle_number7.png]] Press the red button to finish the measure.<br><br>
 
[[image:orangecircle_number8.png]] The move is complete. Continue measuring where you left off before.<br><br>
 
 
<br>
 
<br>
 
</td>
 
<td>
 
[[image:springclamp.png|300px]]
 
[[image:vtube-laser_magnetic_target_springclamp_on_tube.png|300px]]
 
[[image:vtube-laser_clamptarget_to_tube.png|300px]]


</td>
 
</td>
 
</tr>
 
</tr>

Revision as of 00:50, 4 February 2016

Vtube-laser logo 1.96.png

Vtl screen hd scanner without logo.png

Contents


How to Reverse Engineer Using Split Bend

The Split Bend feature allows you to accurately measure bends that equal or exceed 180 degrees.

Split Bend setup is controlled in the Bend Setup tab of the Master Tube menu in VTube-LASER, and in the Bend Setup tab in VTube-STEP. Both modes of VTube allow you to configure Split Bends.

To turn a Split Bend ON for a straight section, you enter the Split Bend window and select the straights that should be treated as Split Bends.

STEP 1: Enter PART SETUP Data

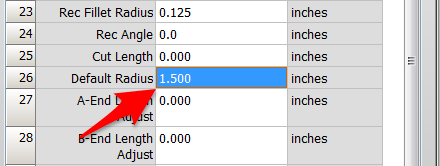
Enter the Part Setup data for the new part. Especially enter the DEFAULT RADIUS. (You can measure the radius if necessary in Measure Process.)

Vtube-laser v2.2 default radius.png

STEP 2: Populate the MASTER TUBE DATA Grid

Since the Split Bend feature creates a grid based on the number of straights in the MASTER data, it is important to set the number of points that you will be measuring in the reversed tube.

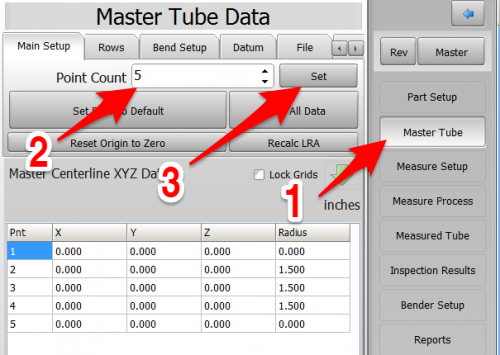
Enter the MASTER TUBE menu, set the point count (which is two more than bend count), and press the SET button. The XYZ values will be filled with zeros like this:

The radius values were automatically filled with the DEFAULT RADIUS value from the PART SETUP menu.

Vtube-laser v2.2 set master point count.png


STEP 3: Configure the Split Bend Window

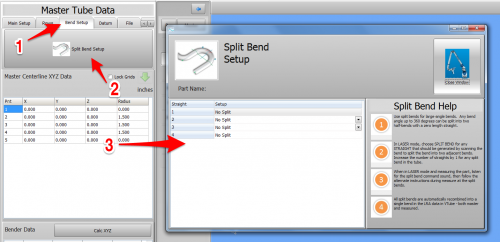
The Split Bend window is on the Bend Setup tab in the MASTER TUBE menu. Click into that window.

Vtube-laser v2.2 enter split bend window.png

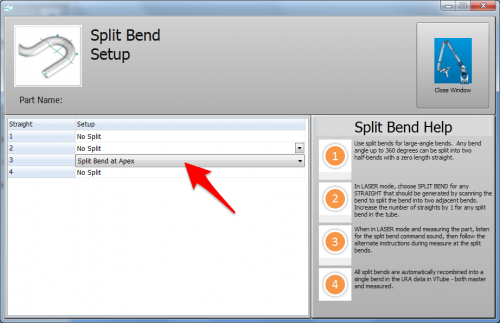
In the Split Bend window, set any straight that will be treated as a Split Bend.

Close the window. VTube will now understand which straight to treat as a Split Bend during measuring.

Vtube-laser v2.2 split bend window straight selected.png


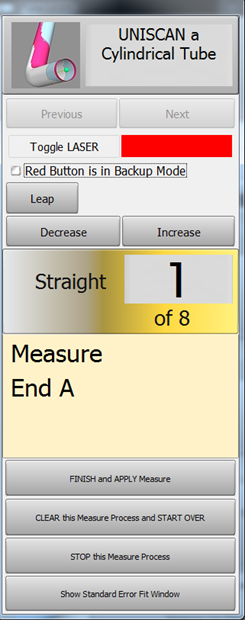
STEP 4: Measure The Part

This step is identical to regular reverse-engineering measuring.

Press FINISH and APPLY Measure when the measurement is completed.

Vtube-laser-v2.2 measureguide cylindricaltube.png

Other Pages