Difference between revisions of "VTube-LASER v1.61"
From ATTWiki
| (14 intermediate revisions by one user not shown) | |||
| Line 19: | Line 19: | ||
<tr valign=top> | <tr valign=top> | ||
<td width=200> | <td width=200> | ||
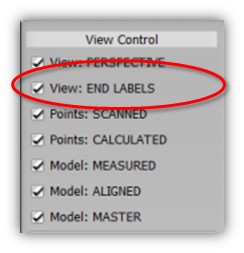
| − | + | Floating end letters can be switched on to help identify the ends A and B of the tube. | |
| + | <br><br> | ||
| + | Control the state of the labels in the View Control pane on the right side of the screen.<br><br> | ||
| + | [[image:vtube-laser_floating_end_labels_checkbox.jpg]]<br><br> | ||
</td> | </td> | ||
<td width=300> | <td width=300> | ||
| Line 29: | Line 32: | ||
<br><br> | <br><br> | ||
| − | ===[[image:Check.jpg|25px]] | + | ===[[image:Check.jpg|25px]] NEW: Can Automatically Expanded or Reduced End A and End B Diameter=== |
<table cellpadding=10> | <table cellpadding=10> | ||
<tr valign=top> | <tr valign=top> | ||
<td width=300> | <td width=300> | ||
| − | + | If either End A or End B are set to a value of ZERO, then they will be automatically calculated based on the straight measurement adjacent to the end of the tube.<br><br> | |
| − | + | The Part Setup on the right is from a measurement of B end tube straight where a 1.130" expansion was measured. End B was set to zero, and VTube automatically filled in the expanded end diameter. | |
| − | + | ||
| − | + | ||
| − | + | ||
| − | + | ||
| − | + | ||
</td> | </td> | ||
<td width=400> | <td width=400> | ||
| − | [[image:vtube- | + | [[image:vtube-laser_partsetup_grid_autoset_enddiameter.jpg|400px]]<br> |
| − | + | ||
| − | + | ||
| − | + | ||
| − | + | ||
| − | + | ||
</td> | </td> | ||
</tr> | </tr> | ||
| Line 55: | Line 48: | ||
<br><br> | <br><br> | ||
| − | ===[[image:Check.jpg|25px]] | + | ===[[image:Check.jpg|25px]] NEW: Automatically Set a ZERO Default Radius to 1.5 Times the Diameter=== |
| − | + | [[image:vtube-laser_automatic_default_radius_setup.jpg|500px]] | |
<table cellpadding=10> | <table cellpadding=10> | ||
<tr valign=top> | <tr valign=top> | ||
<td width=300> | <td width=300> | ||
| − | + | If VTube discovers a default radius value of ZERO, then it will automatically reset the default radius to 1.5 times the nominal diameter before converting to the measured menu.<br><br> | |
| − | + | ||
| − | + | ||
| − | + | ||
| − | + | ||
</td> | </td> | ||
<td width=400> | <td width=400> | ||
| − | |||
</td> | </td> | ||
</tr> | </tr> | ||
| Line 79: | Line 67: | ||
<tr> | <tr> | ||
<td width=300> | <td width=300> | ||
| − | + | * The Diameter Measure control was redesigned.<br><br> | |
| − | + | ||
| − | + | ||
| − | + | ||
| − | + | ||
| − | + | ||
| − | * The | + | |
| − | * The | + | * The Apply to Nominal Diameter button in the Diameter Measure control now properly transfers diameter data to the Part Setup menu.<br><br> |
| − | * | + | * The Apply to Nominal Radius button in the Radius Measure control now properly transfers radius data to the Part Setup menu.<br><br> |
| − | * | + | * The End B diameter is no longer overwritten by the End A diameter.<br><br> |
</td> | </td> | ||
<td> | <td> | ||
| − | [[image:vtube- | + | [[image:vtube-laser_diameter_measure_apply_nominal_diameter.jpg|300px]]<br> |
</td> | </td> | ||
</tr> | </tr> | ||
| Line 103: | Line 85: | ||
<br><br> | <br><br> | ||
| − | ===[[image:Check.jpg|25px]] Issues with this version fixed in | + | ===[[image:Check.jpg|25px]] Issues with this version fixed in newer versions=== |
<table cellpadding=10> | <table cellpadding=10> | ||
<tr valign=top> | <tr valign=top> | ||
<td width=500> | <td width=500> | ||
| − | * | + | * The A End and B End OFFSETs other than ZERO caused a problem where end-scans would never be qualified. Fixed in [[VTube-LASER v1.62]]</td> |
<td width=300> | <td width=300> | ||
</td> | </td> | ||
Latest revision as of 05:16, 12 March 2011
Revision 1.61Back to VTube-LASER |
 NEW: Floating End Letters
|
Floating end letters can be switched on to help identify the ends A and B of the tube.
|
 NEW: Can Automatically Expanded or Reduced End A and End B Diameter
|
If either End A or End B are set to a value of ZERO, then they will be automatically calculated based on the straight measurement adjacent to the end of the tube. |
 NEW: Automatically Set a ZERO Default Radius to 1.5 Times the Diameter
|
If VTube discovers a default radius value of ZERO, then it will automatically reset the default radius to 1.5 times the nominal diameter before converting to the measured menu. |
 Other Changes
|
 Issues with this version fixed in newer versions
|
Other Pages
- Back to VTube-LASER


