|
|
| Line 130: |
Line 130: |
| | | | |
| | ==Other Pages== | | ==Other Pages== |
| | + | * See [[VTube-LASER to Premier, EL2000, Velog Data Transfer]] |
| | * Back to the [[Benderlink Ethernet Module]] Page | | * Back to the [[Benderlink Ethernet Module]] Page |
| | * Back to [[VTube-LASER]] | | * Back to [[VTube-LASER]] |
| | * Back to [[Eaton Leonard]] | | * Back to [[Eaton Leonard]] |
Revision as of 04:43, 1 December 2016
|
VTube-LASER uses the legacy Eaton Leonard Current Loop protocol to communicate with Premier controls. The protocol requires that an RS-232 signal be converted to Current Loop, then sent to the bender.
This diagram demonstrates how a Benderlink Ethernet Module completes the Current Loop connection between a FARO VTube-LASER computer to an Eaton Leonard Premier, or EL-2000 bender control.
The Benderlink Ethernet Module can be wired or WiFi wireless (optional).
|

|
About VTube-LASER to Premier, EL2000, Velog Communications
|
(Note: The features described here require VTube-LASER version 2.7 or greater.)
VTube-LASER can communicate with legacy Eaton Leonard benders through current loop electronics (see Benderlink Ethernet Modules).
VTube-LASER will allow for the complete setup of all bender and setup data that can be stored in a Premier, EL2000, or Velog control.
The Eaton Leonard values are never lost because this data is now stored inside each VTube-LASER project file.
Press the new "Additional Bender Data" button at the top of the Bender Setup screen, and VTube will now load the new Eaton Leonard Setup window shown (see the second image).
YBC Velocity, Function, Stop, and C Last Included
This data includes all the part setup data and all the data that is included in each YBC row, including these data columns:
- Y
- Y Velocity
- Y Function
- Y Stop
- B
- B Velocity
- B Function
- B Stop
- C
- C Velocity
- C Function
- C Stop
- C Last
Click on the image on the right so see a close-up of this screen.
YBC Data Automatically Synchronized with Blue Column LRA Data in the Parent Window
The YBC data in this Eaton Leonard Setup window is always synchronized with the blue columns in the parent VTube Bender Setup window.
Change the data in either window, and the corresponding data in the other window will automatically change.
Use Either Inches or Millimeters
The screen allows you to switch between Inches and Millimeters and back again with the press of a single button.
|


|
How to Use Communication Between the Premier and VTube-LASER
Communications between VTube-LASER and the Premier is very easy to do because it's robust and also very intuitive.
|
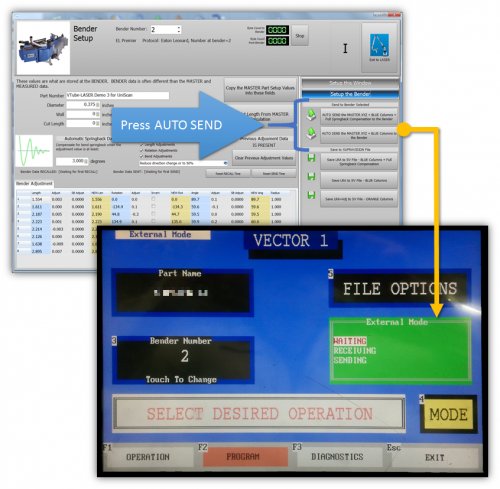
All communications from the PREMIER control occurs in the VECTOR 1 screen shown here.
VTube-LASER knows how to communicate using the VECTOR 1 protocol.
When you enter this screen note that the REQUEST TRANSFER box on the right is BLACK. This means that the Premier is not ready for communications yet.
|

|
|
To put the Premier in communications mode, make the REQUEST TRANSFER box active (green) like is shown here. The WAITING field will be highlighted.
Before you make that button active, check on the following settings:
CHECK 1 - CORRECT MODE IS ACTIVE
The MODE in the upper left corner should read "EXTERNAL MODE". It is controlled by the yellow button on the bottom right side of the screen. This mode allows VTube-LASER to control the communications.
CHECK 2 - BENDER NUMBER MATCHES
The bender number in both this menu and the VTube-LASER Benderlink setup must agree. If they don't, then VTube and the PREMIER will at least issue warnings or dialogs.
CHECK 3 - CORRECT PART NAME IS ON THE SCREEN
If you plan on using the RECALL inside VTube-LASER, then it is important that the correct part name shows in the Part Name field.
If the part names don't match during a VTube-LASER RECALL, then communications will fail. (VTube-LASER sends a 4 byte request, then the PREMIER returns a short 20 byte answer - which is not an entire part, then VTube will time-out.)
|

|
SENDING from VTube-LASER to the PREMIER
|
SENDING data from VTube has slightly different rules than performing a RECALL.
PRINCIPLE 1 - VTube-LASER Data OVERWRITES When SENDING to the PREMIER
When you SEND data from VTube-LASER that has a different part name or different YBC data, then whatever is sent OVERWRITES the data in the PREMIER.
The PREMIER control just politely assumes that whatever data is incoming is the new correct data - and just allows it to overwrite the current data.
PRINCIPLE 2 - KEEP THE CURRENT SETUP FOR A NEW PART
The data that is overwritten is the PART NAME, the CUT LENGTH, and the YBC data with all the FUNCTION blocks cleared. So when sending a new part, you might want to keep the current tool setup of the previous part as a template to save time in setup. Otherwise you will need to reset all the values before bending the first part.
|
|
Other Pages


